|

|
|
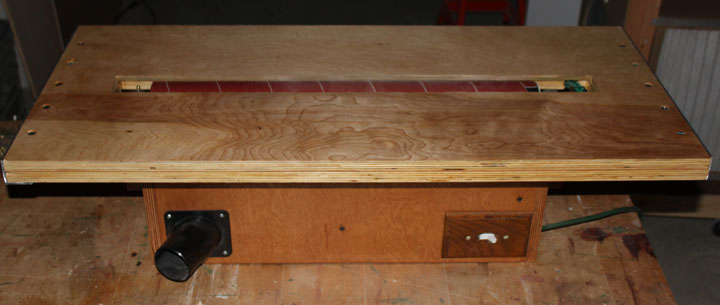
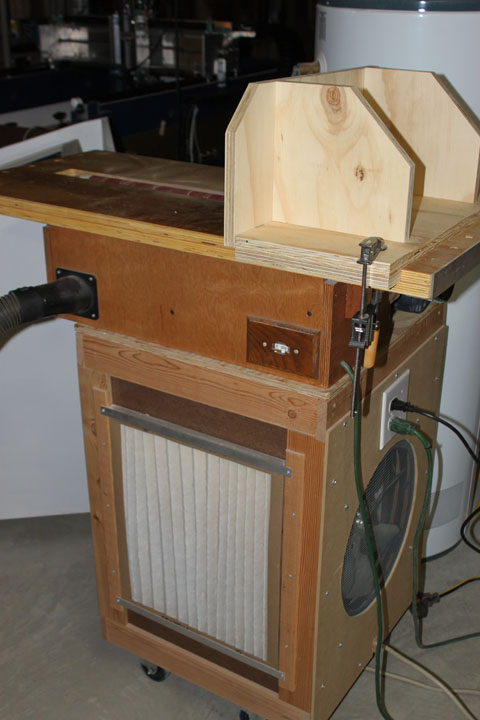
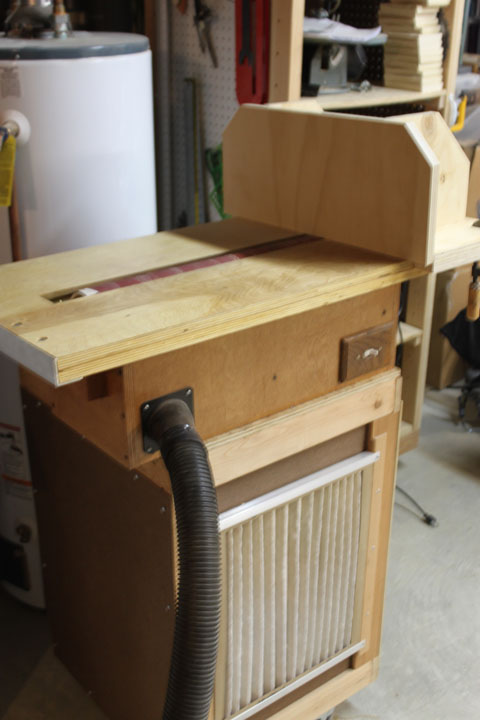
Fig. 1 This page is a short build log of making a "hook and loop" type drum sander, sometimes called a V drum sander after the trade name Velcro. Also, this kind of sander is sometimes called a "face" sander, or finish sander. It is a drum sander since it employs a drum to support the sandpaper, but this term is often confused with a thickness sander, which is a different type of sander. After seeing one like this at a trade show and doing a survey of other woodworker's experiences using this kind of tool I decided to make one, as it has several advantages. First and foremost is the claim that the sandpaper hardly ever wears out! The idea is this: the sandpaper is held in place on the drum by the hook and loop technology. A perfectly flat table top parallel to the drum with a slot running the length of the drum in it is positioned such that a board flat on the table is just shy of touching the sandpaper with the motor off. When the 1725 rpm motor is turned on, the sandpaper is thrown out slightly (about 15-20 thousandths) from the drum by centrifugal force, but held in place by the Velcro such that the sandpaper is continually being thrown against the surface of the board. Heat is what kills sandpaper, but since the board never "bears down" on the sandpaper, no significant heat is ever generated. I've seen them in operation, and they work. I saw one sand the face of an old latex painted board in one swipe with nothing gummed up on the sandpaper, and I was pretty much sold on the idea. It only takes off a specific amount each pass. To take off more per pass, you just need to put a coarser sandpaper on the drum. This is unlike a "thickness" sander, where you can the adjust the amount you want to take off, but you buy a lot of sandpaper that way. The basic plans for this used to be available at www.stockroomsupply.com, but I've changed their design a bit. They sell either a finished tool or a kit of parts with plans on the above website in either a 2 inch dia. drum or a 4 inch dia drum version. I decided to make the major parts myself, but if you buy their drum kit you only have to make the box. In terms of size, I split the difference and decided on making a 3 inch dia. drum, and re-drew the box dimensions to accommodate.
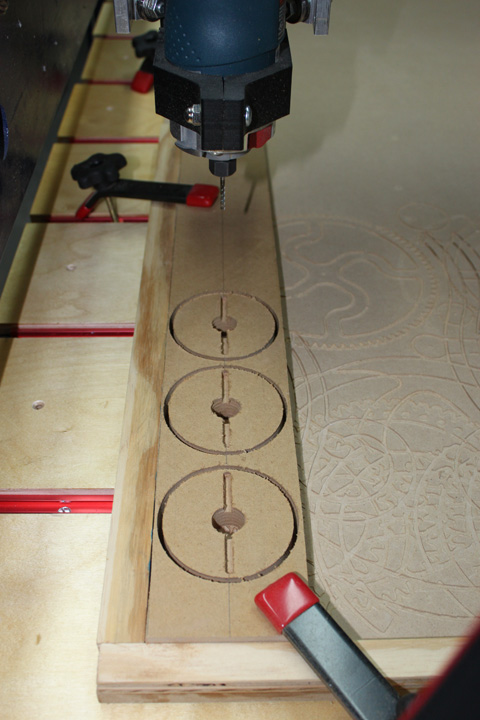
Fig. 2 First thing I did was to make the drum supports. Above shows the 3/4 inch mdf disks that are cut out on the CNC router. They are sized to fit the inside of a 3 inch dia. PVC pipe, and have a 3/4 inch hole for the drive shaft. The long pockets across the center hole are to fit some 3/8 rod that will go through the drive shaft and transmit the torque to the disks. They will be epoxied in place.
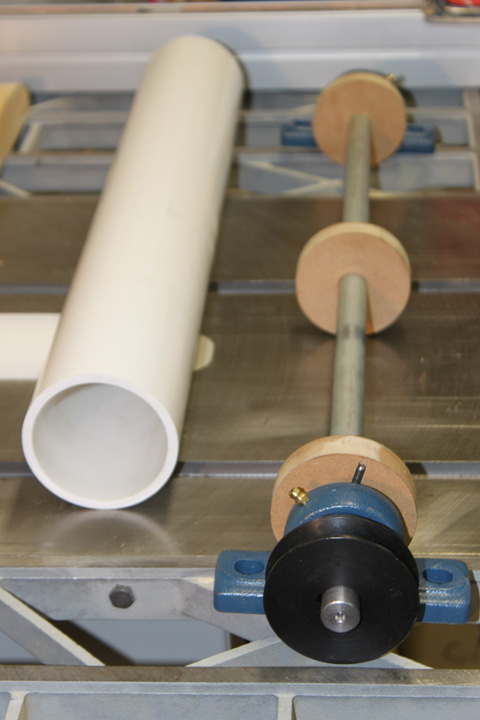
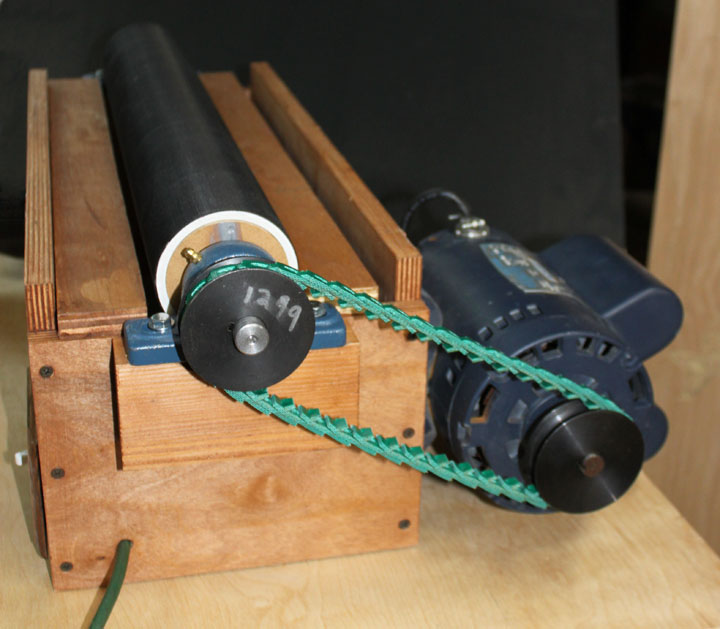
Fig. 3 Above shows the major parts of the drive shaft - the 24 inch PVC 3 inch diameter pipe on the left, the 3/4 inch drive shaft, the three mdf wheels cut out in Figure 1, a 2.5 inch pulley to fit the shaft, and two pillow blocks with 3/4 inch bearings in them. The shaft, bearings, and pulleys I got from a farm supply store. Since I was using inexpensive steel rod, instead of precision drill rod, I found that the shaft ends needed to be turned down a hair to get them into the bearings. The 3/8 torque rods are in place, but not epoxied yet.
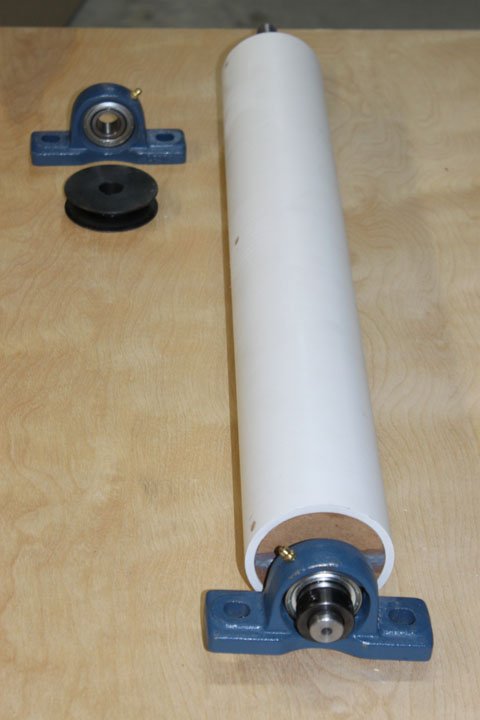
Fig. 4 I glued and pinned (with some 3/8 inch oak doweling I had) the pipe onto the wheels and epoxied the torque rods in the wheels. Also, the PVC pipe was found to be not quite round, so I took it to a friend who has a nice lathe (Frank Kerner) and we turned it down by about 30 thou or so, so now it spins with no discernible vibration on the surface of the pipe. You could obviate the need for a lathe by spinning the drum on a completed table before applying the velcro, just holding some sandpaper flat across the length of the drum.
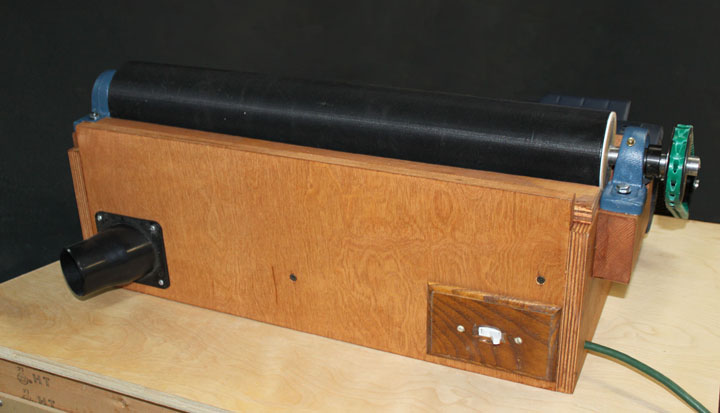
Fig. 5 Above is the 3/4 inch birch ply box with the drive shaft mounted, the motor and belt on, the wiring done, and a dust collector port attached. The bottom of the box is sloped along the screw line in the picture above to encourage the sawdust to fall down toward the collector, as well as form a pocket for the switch box. I've also attached the self-stick hook side of the Velcro material to the drum. I'd like to know what adhesive they use for that - its the most tenacious and sticky stuff I've ever seen. Onto this will be wrapped the loop backed sandpaper roll.
Fig. 6 The motor is a 1/3 hp Tesson motor I got for cheap on Craigslist - if it turns out not to be enough, I'll get the 1/2 hp motor they sell at Harbor Freight. for $60, which is also where I got the green vibration-resistant link belt for the pulleys shown above.
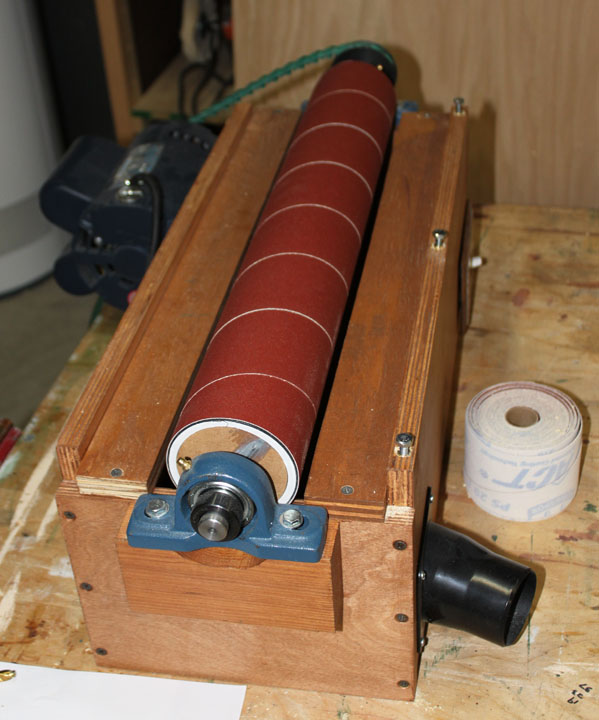
Fig. 7 Above, a strip of sandpaper is cut from the roll on the right and wrapped around the drum. The sandpaper has the loop side and the drum has the hook side of the attachment. Also, the front (on the right in the photo) side of the box has been drilled and some brass threaded inserts screwed in to support some bolts which can be adjusted for table height. After the correct adjustment, they will be fixed in place with the non-permanent type threadlocker.
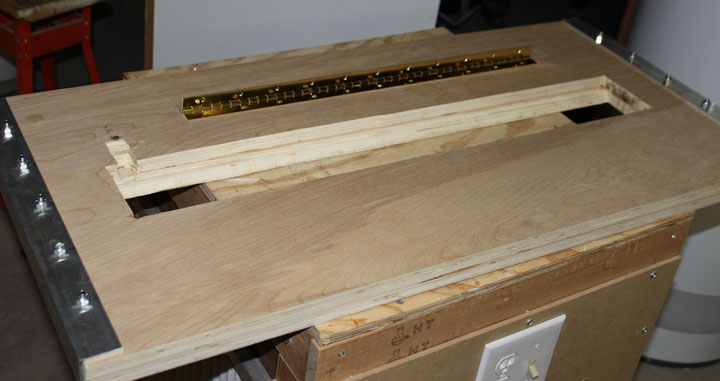
Fig. 8 Above is the bottom of the top- two 3/4 inch plywood pieces glued under clamp pressure - which has had the slot cut in it at an angle and routed with a ball rasp to keep the gap around the drum about 1/4 inch to make sure the vacuum has a good pull across it. There is also a cut-out on the left for the link belt to clear. Also, I've bolted some 1/8 thick aluminum angles along the sides to make sure the table top stays flat. A piano hinge is placed along the back to attach it to the box. A couple coats of polyurethane, and after screwing on the piano hinge, the table is finished as shown in Fig 1.
Fig. 9 & 10 I found that once the top was on, it wasn't quite parallel to the drum, so I needed to shim one of the pillow blocks up about a 1/16th to make it perfectly parallel, and then I set the table height. This is critical - while sanding, you should be able to stop the board in the middle of the pass and not have a groove on the board. If there is a groove, you need to raise the table a bit. I also need to sand boards on edge, so I made a simple tall fence that slides left to right across the table, and is just clamped in place when needed. Changing the sandpaper is easier than any other sanding machine I have - to remove it, you just grab the wedge tip on one end and pull it out in one motion. If it takes you longer than 3 seconds to remove the paper, you're doing something wrong - it is velcro, after all. To add the new paper, you align the strip parallel to the sides, and turn the pulley while feeding it on - about 15 seconds. However, you do have to cut a wedge shape off each end of the new strip - this is easily done by just using the old strip as a pattern for the new one. Search for "Klingspor" to find a dealer for the rolls of velcro backed sandpaper in various grits. BTW, the sander is sitting on a roll around room air cleaner made from furnace filters and a gable attic fan that provides power and serves as a base for several other tools. You can see more about that here. The floor unit is used mostly to clear the air so that I can apply finish to a project without a lot of dust settling on it. Every once in a while I vacuum the filters from the outside to keep it breathing freely. I have found that this sander does indeed make the sandpaper last a long time. In fact, after over a year's use now, I have only changed it twice - once when I sanded a painted board when it wasn't quite dry yet (my own stupidity) that gummed up the paper, and once when an errant hardwood splinter was caught just right and tore up the sandpaper in the middle of the strip. Thanks for viewing this build log! Warning: This is a powered shop tool. You must exercise caution using this tool. Use proper shop safety procedures at all times. Especially do NOT wear loose clothing around this machine as it can get pulled into the machine, along with you. The drum turns at 1750 RPM and will trim your fingernails, as well as many other body parts, in the blink of an eye! Also, this machine will make a lot of airborne dust very quickly, up close to your face. Attach a dust collection system and turn it on before using this machine, and use a good filter mask. If you do not agree about the importance of these warnings, then you should not be using this machine! |
|