

Tools
"Building an airplane is just a good excuse to buy tools!"
Zenith provides a list of minimum tools that you will need. They are:
- Electric hand drill
- 3/16, 1/4, 5/16. 3/8, and #20 and #30 size drill bits
- 12 ft metric measuring tape
- 150 copper (1/8") clecos
- 75 black (5/32") clecos
- cleco pliers
- sheet metal snips - they recommend Wiss, both right hand and left hand
- flat, round, and half round hand files
- fine tooth hack saw
- hand riveter and ground "dome" heads
- a set of standard wrenches
- ratchet set
- screwdrivers,
- hammer
- various clamps
Also, when you look in the errata updates, they add:
- Vixen file (see below)
- #3 drill bit (.213") and 1/4 - 28 tap
- hand riveter with flat nose for 3/32 flush rivets
- Angle drill for #30 drill bit
- fly cutter for cutting sender holes in the fuel tank
- Unibit to drill the windshield
- heavy duty hand riveter to pull the stainless steel rivets on the firewall
- hole saw
They also say a drill press and a bench vice might come in handy. I already had both and yep, I've used them. Of course, you will also need the workshop space and a table. I am building in a single stall garage and it is tight, and for what I did about building a table, look here.
Some of my own notes about the needed tools, starting with Zenith's list:
Curiously, the directions also call for the need for tools that do not appear on the list above:
- The directions call for you to use about 70 silver or 3/32 or #40 clecos, as well as the ones listed above. These are necessary because they recommend (with good reason) that you drill small holes (3/32" which fit these silver clecos), cleco everything together to make sure of fit, and then open the holes to the larger sizes for riveting and deburring. I found you need a lot more of the black ones near the end.
- The directions call for you to use a fluting plier, which is described below.
- You are definitely going to need some ratcheting type straps for the tight wrapping of the skin sheets around the stabilator and the wings. I used seven of the them on each wing, and I was glad I had them.
- The first tool you pick up in the workshop, and one that is also not on the list is a Sharpie marker. They make both a fine line and a ultra fine line version. I've used both. The fine line is almost 2mm wide and gets wider with use. It is the one used in the manual, but I think ZAC used them because they show up better in the photos. I used the ultra fine ones in practice, especially if you want your rivet lines to be precise. Also, you need to have some lacquer thinner on hand to remove the marks. Don't be afraid to write directions, orientation arrows, notes, or part numbers right on the part.
Make sure you have a good set of leather gloves, especially when handling or cutting the sheet metal. After cutting an edge, before you've filed it down, the sheet metal will really do a number on your skin. While on that note, if you don't already wear safety glasses, get some or some goggles while drilling. Make sure they are good ones and comfortable or you won't want to wear them. Picking an aluminum sliver out of your eye is not going to be fun, so use good shop safety precautions.
Before buying a lot of tools, seek out and join your local EAA chapter if practical. There you can meet other builders who have access to some tools you can borrow. Very good candidates of expensive tools to borrow that you will need for only a short time are: Nicopress swage, solid rivet squeezers and pneumatic guns, engine hoists, flaring tools for fuel line fittings, etc.
There are many builders who pull the thousands of rivets on this plane by hand - they're the ones with the strong forearms at the airshows. In fact, Chris Heintz said he could tell how far along a builder was on his project as soon as he shook hands with him. However, I think it is well worth it to invest in an air compressor for about $300 and use both the pneumatic riveter and an air drill. The air drill spins faster than the electric ones (although with not quite as much power) and mine is lots lighter. You will appreciate the light weight when it is time to drill the hundreds of holes in the wing, turning yourself into a human drill press. You will still use the hand riveter in tight spots, but the ground "dome" heads will fit on both the air and hand rivet pullers.
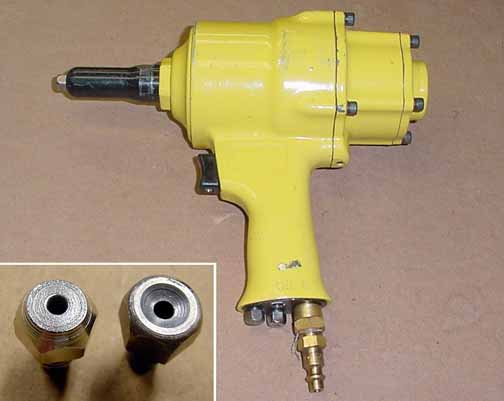
This is the one I got from ZAC. Works fine, but it is limited to 90 psi or the rear casing will crack. This is not a big thing, though, either way. If you already have a drill you know and love, and have no trouble with a hand riveter, then your plane will turn out just as good.
Whether you get your riveter from ZAC or somewhere else like Harbor Freight, you will need to have the "dome" heads ground properly. This is something that Chris Heinz specifies, not something you can pick up at the hardware store, so talk to ZAC about getting the dome heads. They are interchangeable with the air riveter or both of the hand riveters. I bought my pneumatic riveter at the rudder workshop which had the ground heads. Above, the insert shows a riveter head on the left as they come, used to install flush rivets, and on the right is one of the heads ground out to form the rivet dome.
You may need to adjust the pressure to the air riveter in order to reduce "bounce" or snapping the mandrel back with too much force. I found I usually set mine to 50 psi or so for the A4 rivets and 80 psi for the A5s. ZAC does supply plenty of rivets, so practice a few times at first. There are a couple of places that call for A6 rivets, and the air riveters won't pull those, and can damage them.
Another power tool I acquired later on in the project that is very helpful is a 4" Angle Grinder that I got on sale at Harbor Freight for $24. It came with one 4" metal cutting wheel, and it looks like that will last the whole project. It is a hand held bench grinder, with an especially powerful motor. It is useful for cutting and trimming the 4130 steel, as well as cutting the notches in the thick aluminum landing gear. Be wary of where the sparks are going to go when you first apply it, and safety glasses are a must.
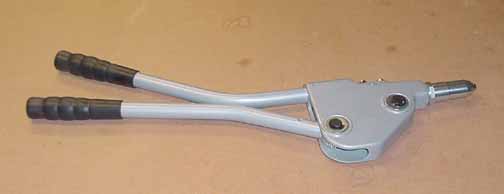
The instructions for the firewall include a warning that the pneumatic rivet puller may not be enough to pull the A5 stainless steel rivets, and they suggest the $20 heavy duty hand puller from Harbor Freight, shown below:
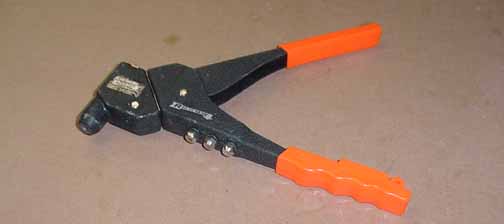
Also, below is the regular hand puller I used. This particular one has a swivel head, which was really helpful in some spots, but just one more thing to keep straight at other times.
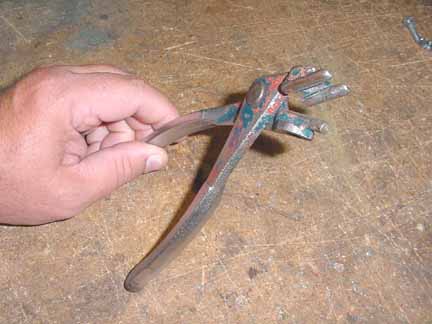
Before leaving the topic of riveting, I found there are times when a solid rivet is just the thing to use. If you talk to an RV builder, he will tell you that you should always squeeze a rivet whenever you can, because bucking one is often error prone. If you just have a couple to do, and you can position the piece easily over an anvil or vise, just a few taps with a hammer will do. However, some places can't be done that way, and rivet squeezers are pretty expensive. I found a lower cost alternative that also works for making dimples for flush rivets, thanks to the advice of Jerry Erickson of my local EAA chapter. Essentially, it is a pair of vise grips with various die attachments for rivet and dimple squeezing, shown below:
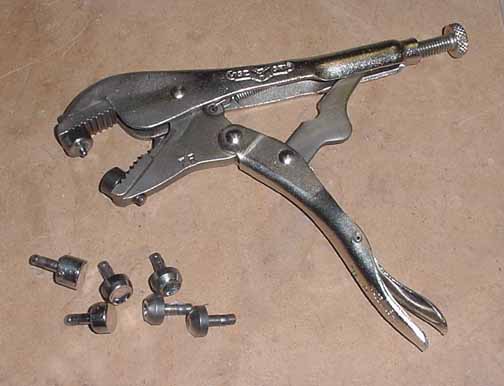
The dimple dies are in the tool, and the rivet dies are shown below. You adjust the knob on the handle to set the rivet depth. This only allows you to rivet within an inch or so from the edge of the metal, but the more expensive squeezers are limited as well. For dimples anywhere on a sheet, you can also get a cheap dimple squeezer from the same company that uses your hand riveter - it has a mandrel that you reuse, and pulls the two dies together to make the dimple. These are from Aircraft Tool Supply.
You will need a good set of drills housed in an index so you can find them. The #20 and #30 carbon steel drill bits ZAC sells are good, and a couple will stay sharp enough for drilling out most of the aluminum. (Assuming you don't drop the drill onto concrete right at the tip!) However, when it comes time to drill that really hard 4130 steel, you might want to consider finding a machine tool company in your town that carries cobalt bits in those sizes. They do a much better job of cutting the steel parts, and they're less than a couple of bucks each. Also, I bought a couple #20 long bits from Wicks that I found useful for getting into hard to reach places.
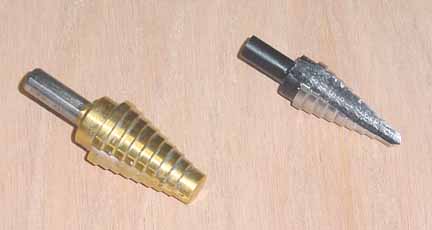
For cutting larger holes in aluminum, I've used a Unibit, or step drill many times with very good results, but you must keep a steady hand on the drill or the hole center can wander. The one on the right is a Unibit brand, which goes to 3/4", and the one on the left (from Sears) which goes to 1 inch..
Another good drilling tool is a small 1/4 flexible shaft extension - it has a shaft end that you put in your drill chuck, and it provides another chuck at the other end up to a 1/4 inch bit, but is only an inch or so in diameter. This allows you to drill very close to a plane that is parallel to the drill. I got mine from Harbor Freight for 20 bucks. Yet another drilling attachment is the fly cutter, which enables you to drill large holes (up to 4-5 inches) in the sheet metal. Make sure the cutting edge is ground sharp.
I have also used a Dremel tool from time to time, using either an end mill type bit or a small grinding stone bit to take off a little material in a hard to get to place. If you are using the end mill type bit, make sure you have a Dremel that has variable speed and set it at the lower speeds or the aluminum will melt and clog the bit. Make sure you use eye protection with this, too. Use this with extreme caution though - like any power tool, you don't have nearly as much control as with a hand tool, and you can do a lot of damage in a short time.
Below on the left are the shears I've used a lot. I have the aviation style Wiss shears, but I end up using the ones below when the metal is thin, like .025 because it allows me to cut the sheet like paper, with long, straight cuts. The directions talk about making a rough cut about 1/8 - 1/4 inch away from the marked finished edge, and then making a pass along the line so that the scrap easily curls up and out of the way - they are right!
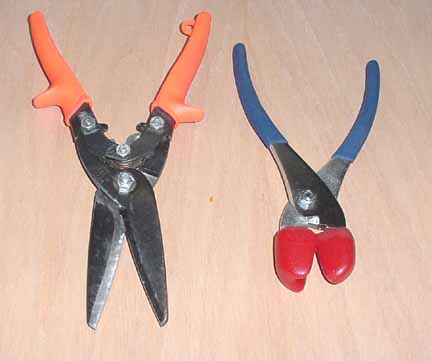
The one on the right is the fluting pliers, which I mail ordered. By the way, you can weld your own fluting pliers from a pair of cheap cleco pliers and some steel 3/8 inch rod:
The fluting pliers above are one of the ones they use at ZAC.
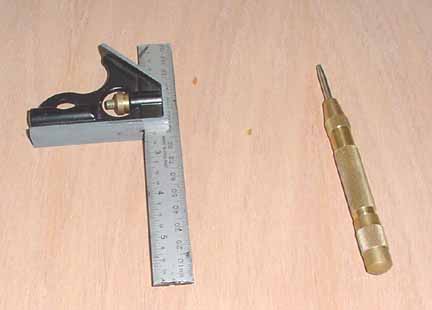
Another couple of valuable tools are the small 6" metric square, which is great for setting at 10mm and laying out rivet lines. Another good thing for measuring - as soon as you cut off a 2-3 ft piece of scrap sheet about an inch or two wide, use the factory edge as a wrapable straight edge. You can mark off 40 mm pitch lines on it to help layout as well.
On the right above, the spring loaded punch is really great for laying out nice rivet lines. You just press the tip onto the mark on the aluminum, push the handle down until the spring snaps, at it leaves a punch mark in the sheet - 3 bucks from Harbor Freight. When you punch aluminum, it will leave a slight dimple - you get around this by always making sure there is some steel flat behind the aluminum when you punch it, and also make sure the resulting dimple is smaller than the hole you will be drilling. It works surprisingly well in the steel, too.

Something else I used quite a bit is a template for tracing and, more importantly, centering circles of various diameters. I got these at a craft/art supply store quite a while ago. Make sure you get ones with cross hairs for each circle.
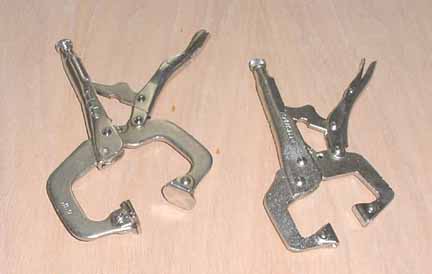
The clamps on the list are varied - I've used wood clamps and spring clamps, but the ones above I've used the most. I really like the ones on the left because of the broad swivel faces at the end of the clamp arms. If you have an uneven edge, these can be used to make it flat again.
I've also used a belt sander many times - great for fine tuning a rough cut, especially on the thicker pieces cut with a hacksaw that leaves tooth marks. Also, get yourself a deburring tool. Running it down the edge of the aluminum after a cut makes a great edge and helps to eliminate any slight cut or cracks that is the starting point for a real crack once the piece is under stress.
You won't need a large brake for making long bends if you are building the kit, but I found an 18 inch (about $20) brake from Harbor Freight very useful for making mounting brackets, the map box, center console, avionics stack, etc.
One other tool I've used a lot is the Jilson tool - its a cross between a nibbling tool and a shear. (Picture on the wings page.) I ordered it from Cleaveland Tool (that's how its spelled - see my links page) and they call it a "Quicksnip Metal Shear" but when you get it, it is made in France by a company called Jilson. It cuts a 1/10 inch wide swath, and if you close the handles all the way, a .1 by .4 inch rectangle or so of it is punched out. If you stop short of closing the handles, it curls up and you can move the tool forward, using it like a pair of shears. Makes a very nice edge that cleans up with minimal filing. It can start in the middle of sheet metal with only a 3/8 inch starting hole. I've found it useful to cover the face of the tool that rides on top of the sheet with a layer of duct tape to keep the surface from being scratched.
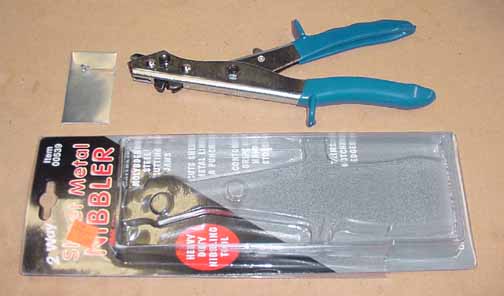
Good news (as of October 2002) - the tool I mentioned above now has a clone that is sold by Harbor Freight for $5.95! They call it a sheet metal nibbler, and is item 00539. Above, the scrap of sheet metal has the .1 inch slot cut in it, showing the curl that is produced.
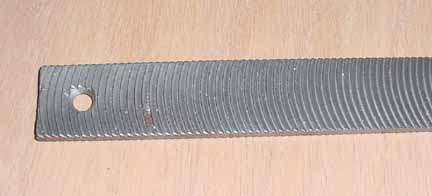
Speaking of files, if you have hand files with the pointed tangs on them, it is well worth the buck or so to get the plastic handles to put on them. Your hands are going to be in enough peril around all the sheet metal edges as it is! Also, the best file to make a smooth edged line in a hurry is the Vixen file, shown above. I got a couple off Ebay, and they work great!
Another tool I've used a lot, but you can get by without one, is a bench belt sander. It works great for removing that last 1/8 or 1/16 th inch or so and leaves a good edge, and you can easily put a slight bevel on it. Sometimes a better edge is produced by running a deburring tool down the cut edge.
There are some places where you drill holes but are unable to get to the other side of the hole to deburr it. I asked the mailing list for recommendations for deburring tools, and got several replies. The best one came from Doug Garrou who uses a Noga Mini-Reversible Countersink.. ($17.95 from Reid Tool Supply #RY-22455 - see links page) It looks like this:

The upper left corner picture is what the tool looks like on the other side of the hole, and the upper right picture is what it looks like with the silver end depressed and you can insert it into the hole. Does a great job of getting those big burrs on the other side. Too many turns and you start to countersink, though. Practice on a scrap hole and you get the feel for it very easily. It handles both #20 and #30 holes.
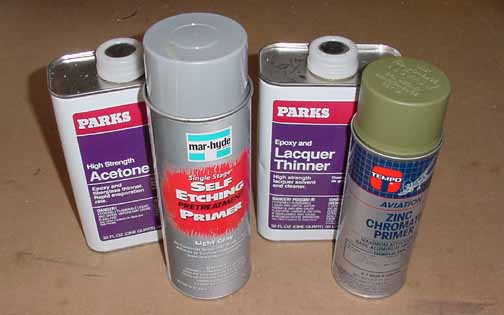
These are the fluids - lacquer thinner is used to clean the aluminum and remove labels and marker lines. (If you let the labels soak for a minute or so, they come right off with the adhesive.) The zinc chromate is from Wicks. (See the corrosion page.) For the steel parts, the Mar-Hyde self etch primer (#5111) is used, available at auto paint supply stores, and to clean the steel parts to prep them for painting, acetone. Both acetone and lacquer thinner I got at a home supply store. All of these are volatile, and you need good ventilation to use them.
Last, and hardly least, are the books. The learning curve for building your own safe airplane is pretty steep, and you are going to need help. Although tech counselors are very valuable and are highly recommended, they too agree that all aircraft mechanics, engineers, and homebuilders get most of their information through reading technical literature.
Below are some of the books that I have found very helpful, along with some personal comments about them. Of course, for your particular mission and aircraft, you might come to a different opinion.
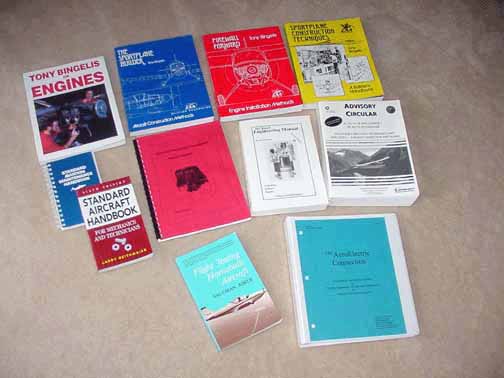
The top four are collections of Sport Aviation articles written by the late Tony Bingelis over the years, and are great - all technique and little theory, they really help to give you a roadmap of how things are done, as well as introductions to other construction types, like wood/fabric and composites. The Tony Bingelis on Engines is aimed primarily about Lycoming type engines, so if you are doing an auto conversion, you might want to borrow that one first to see if you find it useful.
The right hand middle row is AC 43.13 Advisory Circular, Acceptable Methods, Techniques, and Practices - Aircraft Inspection and Repair. It is completely available online, but having a printed copy on the workbench makes me more likely to look something up, which you should do. Its the bible of aircraft construction. Going left, the Skyranch Engineering Manual by John Schwaner is a wonderful book on aircraft engines - it includes theory as well as practice on installing and tuning and troubleshooting aircraft engines. Next to it is Efficient Powerplant Installation Piston Engines by Sonja Englert, a new book, but is mostly the same material that's in sections of Bingelis and Skyranch. To the left most middle row are two handbooks, Standard Aircraft Handbook by Larry Reithmaier, and Standard Aviation Maintenance Handook by Jeppesen. These are great for looking up info for things like torque values, sheet metal alloys, plumbing fittings, rivet spacing, etc. Although about 80% of these overlap, but I found something I needed something in only one of them often enough.
The bottom row, left side is Flight Testing Homebuilt Aircraft by Vaughn Askue, which is a good introduction to what you need to do for those first 40 hours of flight, and how to properly plan and prepare for the checkout. To the right of that is the Aeroelectric Connection, by Bob Nuckolls, which is a very good, very detailed explanation of aircraft electrical systems, complete with sample wiring diagrams and more than enough information to adapt one to your airplane. Bob also has an excellent website.
Tools can be a personal thing - these are just my choices. It will pay you to keep your ears open about new or different way of doing things.
![]()
![]()
Images on this website are copyright Gary Liming